Babel的核心原理解析
在平时前端项目的开发,一般都会使用Babel来参与构建工程,这其中少不了使用各种Babel插件。 最为我们所熟知的是 @babel/preset-env,它包含了一些列支持ES6+的插件集合,通过这些插件将源码转化成目标平台可运行的JavaScript代码。 仅知道怎么用对于一个前端程序员还不够,为了提升自己的level,我们还得知道其中的原理,自己能手写出一个插件来。
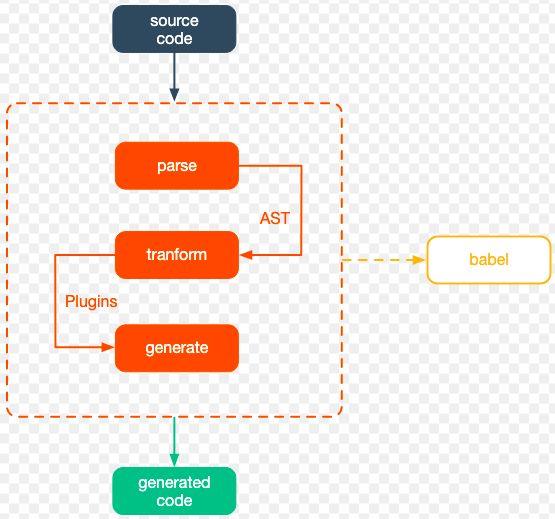
熟悉 Babel 处理流程
Babel 是⼀个通⽤的多功能的 JavaScript 编译器。此外它还拥有众多模块可⽤于不同形式的静态分 析。
静态分析是在不需要执⾏代码的前提下对代码进⾏分析的处理过程 (执⾏代码的同时进⾏代码分析即是动态分析)。 静态分析的⽬的是多种多样的, 它可⽤于语法检查,编译,代码⾼亮,代码转换,优化,压缩等等场景。
Babel 的三个主要处理步骤分别是: 解析(parse),转换(transform),⽣成(generate)
了解AST(抽象语法树)
Babel 使⽤⼀个基于 ESTree 并修改过的 AST
这是一个简单的 求平方的 JS 函数,它转换成 AST是什么样的呢?
function square(n) {
 return n * n;
}
function square(n) {
return n * n;
}程序的源代码,会被解析成下面的AST结点树的形式,方便计算机识别和处理。
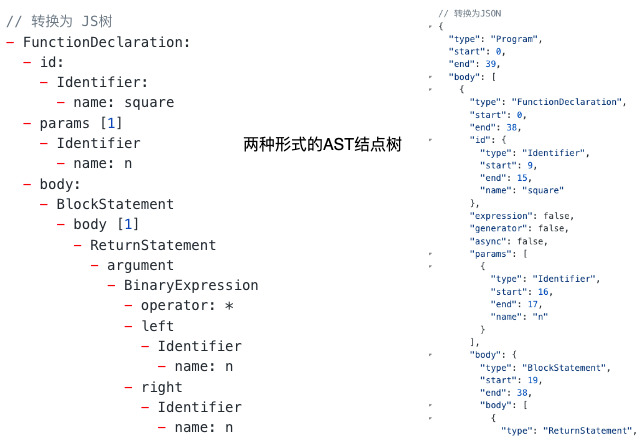
这⾥⾯每⼀层的AST都有相同的结构:
{
type: "FunctionDeclaration",
id: {...},
params: [...],
body: {...}
}
{
type: "Identifier",
name: ...
}
{
type: "BinaryExpression",
operator: ...,
left: {...},
right: {...}
}{
type: "FunctionDeclaration",
id: {...},
params: [...],
body: {...}
}
{
type: "Identifier",
name: ...
}
{
type: "BinaryExpression",
operator: ...,
left: {...},
right: {...}
}这样的每⼀层结构也被叫做 节点(Node)。 ⼀个 AST 可以由单⼀的节点或是成百上千个节点构成。 它们组合在⼀起可以描述⽤于静态分析的程序语法。每⼀个节点都有如下所示的接⼝(Interface):
interface Node {
type: string;
}interface Node {
type: string;
}除此之外,babel还为每个节点⽣成额外的属性,描述该节点的位置
{
type: ...,
start: 0,
end: 38,
loc: {
start: {
line: 1,
column: 0
},
end: {
line: 3,
column: 1
}
},
...
}{
type: ...,
start: 0,
end: 38,
loc: {
start: {
line: 1,
column: 0
},
end: {
line: 3,
column: 1
}
},
...
}解析(parse)
解析步骤接收代码并输出 AST。 这个步骤分为两个阶段:词法分析(Lexical Analysis) 和 语法分析(Syntactic Analysis)。
1.词法分析
词法分析阶段把字符串形式的代码转换为 令牌(tokens) 流。可以把令牌看作是⼀个扁平的语法⽚段数组:
n * n;
[
{ type: { ... }, value: "n", start: 0, end: 1, loc: { ... } },
{ type: { ... }, value: "*", start: 2, end: 3, loc: { ... } },
{ type: { ... }, value: "n", start: 4, end: 5, loc: { ... } },
...
]
// 每⼀个 type 有⼀组属性来描述该令牌:
{
type: {
label: 'name',
keyword: undefined,
beforeExpr: false,
startsExpr: true,
rightAssociative: false,
isLoop: false,
isAssign: false,
prefix: false,
postfix: false,
binop: null,
updateContext: null
},
...
}
// 和 AST 节点⼀样它们也有 start,end,loc 属性。n * n;
[
{ type: { ... }, value: "n", start: 0, end: 1, loc: { ... } },
{ type: { ... }, value: "*", start: 2, end: 3, loc: { ... } },
{ type: { ... }, value: "n", start: 4, end: 5, loc: { ... } },
...
]
// 每⼀个 type 有⼀组属性来描述该令牌:
{
type: {
label: 'name',
keyword: undefined,
beforeExpr: false,
startsExpr: true,
rightAssociative: false,
isLoop: false,
isAssign: false,
prefix: false,
postfix: false,
binop: null,
updateContext: null
},
...
}
// 和 AST 节点⼀样它们也有 start,end,loc 属性。2.语法分析
把⼀个令牌流转换成 AST 的形式。 这个阶段会使⽤令牌中的信息把它们转换成⼀个 AST 的表述结构,这样更易于后续的操作。
转换(transform)
转换接收 AST 并对其进⾏遍历,在此过程中对节点进⾏添加、更新及移除等操作。 这是 Babel 或是其他编译器中最复杂的过程 同时也是插件将要介⼊⼯作的部分。
生成
把最终(经过⼀系列转换之后)的 AST 转换成字符串形式的代码,同时还会创建源码映射(source maps)。代码⽣成其实很简单:深度优先遍历整个 AST,然后构建可以表示转换后代码的字符串。
处理 AST⭐️
Babel编译器的核心处理步骤在于对AST结点的处理。
遍历
想要转换 AST 你需要进⾏递归的遍历。⽐⽅说我们有⼀个 FunctionDeclaration 类型。它有⼏个属性:id,params,和 body,每⼀个都有⼀些内嵌节点。
{
type: "FunctionDeclaration",
id: {
type: "Identifier",
name: "square"
},
params: [{
type: "Identifier",
name: "n"
}],
body: {
type: "BlockStatement",
body: [{
type: "ReturnStatement",
argument: {
type: "BinaryExpression",
operator: "*",
left: {
type: "Identifier",
name: "n"
},
right: {
type: "Identifier",
name: "n"
}
}
}]
}
}{
type: "FunctionDeclaration",
id: {
type: "Identifier",
name: "square"
},
params: [{
type: "Identifier",
name: "n"
}],
body: {
type: "BlockStatement",
body: [{
type: "ReturnStatement",
argument: {
type: "BinaryExpression",
operator: "*",
left: {
type: "Identifier",
name: "n"
},
right: {
type: "Identifier",
name: "n"
}
}
}]
}
}于是我们从 FunctionDeclaration 开始并且我们知道它的内部属性(即:id,params,body),所以我们依次访问每⼀个属性及它们的⼦节点。
接着我们来到 id,它是⼀个 Identifier。Identifier 没有任何⼦节点属性,所以我们继续。
之后是 params,由于它是⼀个数组节点所以我们访问其中的每⼀个,它们都是 Identifier 类型的单⼀节点,然后我们继续。
此时我们来到了 body,这是⼀个 BlockStatement 并且也有⼀个 body节点,⽽且也是⼀个数组节 点,我们继续访问其中的每⼀个。
这⾥唯⼀的⼀个属性是 ReturnStatement 节点,它有⼀个 argument,我们访问 argument 就找到了 BinaryExpression。
BinaryExpression 有⼀个 operator,⼀个 left,和⼀个 right。 Operator 不是⼀个节点,它只是⼀个值因此我们不⽤继续向内遍历,我们只需要访问 left 和 right。
Babel 的转换步骤全都是这样的遍历过程。
visitor(访问者)
访问者是⼀个⽤于 AST 遍历的跨语⾔的模式。 简单的说它们就是⼀个对象,定义了⽤于在⼀个树状结构中获取具体节点的⽅法。 这么说有些抽象所以让我们来看⼀个例⼦。
const MyVisitor = {
Identifier() {
console.log("Called!");
}
};
// 你也可以先创建⼀个访问者对象,并在稍后给它添加⽅法。
let visitor = {};
visitor.MemberExpression = function() {};
visitor.FunctionDeclaration = function() {}const MyVisitor = {
Identifier() {
console.log("Called!");
}
};
// 你也可以先创建⼀个访问者对象,并在稍后给它添加⽅法。
let visitor = {};
visitor.MemberExpression = function() {};
visitor.FunctionDeclaration = function() {}这是⼀个简单的访问者,把它⽤于遍历中时,每当在树中遇⻅⼀个 Identifier 的时候会调⽤ Identifier() ⽅法。
function square(n) {
 return n * n;
}
// 以上⽅法会调⽤四次Identifier
path.traverse(MyVisitor);
Called!
Called!
Called!
Called!
// 像这样
- FunctionDeclaration
- Identifier (id)
- Identifier (params[0])
- BlockStatement (body)
- ReturnStatement (body)
- BinaryExpression (argument)
- Identifier (left)
- Identifier (right)function square(n) {
return n * n;
}
// 以上⽅法会调⽤四次Identifier
path.traverse(MyVisitor);
Called!
Called!
Called!
Called!
// 像这样
- FunctionDeclaration
- Identifier (id)
- Identifier (params[0])
- BlockStatement (body)
- ReturnStatement (body)
- BinaryExpression (argument)
- Identifier (left)
- Identifier (right)当我们向下遍历这颗树的每⼀个分⽀时我们最终会⾛到尽头,于是我们需要往上遍历回去从⽽获取到下⼀个节点。 向下遍历这棵树我们进⼊每个节点,向上遍历回去时我们退出每个节点。
- 进⼊ FunctionDeclaration
- 进⼊ Identifier (id)
- ⾛到尽头
- 退出 Identifier (id)
- 进⼊ Identifier (params[0])
- ⾛到尽头
- 退出 Identifier (params[0])
- 进⼊ BlockStatement (body)
- 进⼊ ReturnStatement (body)
- 进⼊ BinaryExpression (argument)
- 进⼊ Identifier (left)
- ⾛到尽头
- 退出 Identifier (left)
- 进⼊ Identifier (right)
- ⾛到尽头
- 退出 Identifier (right)
- 退出 BinaryExpression (argument)
- 退出 ReturnStatement (body)
- 退出 BlockStatement (body)
- 退出 FunctionDeclaration
所以当创建访问者时你实际上有两次机会来访问⼀个节点。
const MyVisitor = {
  Identifier: {
    enter() {
      console.log("Entered!");
    },
    exit() {
      console.log("Exited!");
    }
  }
};
const MyVisitor = {
Identifier: {
enter() {
console.log("Entered!");
},
exit() {
console.log("Exited!");
}
}
};Path
AST 通常会有许多节点,那么节点直接如何相互关联呢? 我们可以使⽤⼀个可操作和访问的巨⼤可变对象表示节点之间的关联关系,或者也可以⽤Paths(路径)来简化这件事情。
Path 是表示两个节点之间连接的对象。例如,如果有下⾯这样⼀个节点及其⼦节点︰
{
  type: "FunctionDeclaration",
  id: {
    type: "Identifier",
    name: "square"
  },
  ...
}
{
type: "FunctionDeclaration",
id: {
type: "Identifier",
name: "square"
},
...
}将⼦节点 Identifier 表示为⼀个路径(Path)的话,看起来是这样的:
{
  "parent": {
    "type": "FunctionDeclaration",
    "id": {...},
    ....
  },
  "node": {
    "type": "Identifier",
    "name": "square"
  }
}
{
"parent": {
"type": "FunctionDeclaration",
"id": {...},
....
},
"node": {
"type": "Identifier",
"name": "square"
}
}同时它还包含关于该路径的其他元数据:
{
  "parent": {...},
  "node": {...},
  "hub": {...},
  "contexts": [],
  "data": {},
  "shouldSkip": false,
  "shouldStop": false,
  "removed": false,
  "state": null,
  "opts": null,
  "skipKeys": null,
  "parentPath": null,
  "context": null,
  "container": null,
  "listKey": null,
  "inList": false,
  "parentKey": null,
  "key": null,
  "scope": null,
  "type": null,
  "typeAnnotation": null
}
{
"parent": {...},
"node": {...},
"hub": {...},
"contexts": [],
"data": {},
"shouldSkip": false,
"shouldStop": false,
"removed": false,
"state": null,
"opts": null,
"skipKeys": null,
"parentPath": null,
"context": null,
"container": null,
"listKey": null,
"inList": false,
"parentKey": null,
"key": null,
"scope": null,
"type": null,
"typeAnnotation": null
}在某种意义上,路径是⼀个节点在树中的位置以及关于该节点各种信息的响应式 Reactive 表示。当你调⽤⼀个修改树的⽅法后,路径信息也会被更新。 Babel 帮你管理这⼀切,从⽽使得节点操作简单,尽可能做到⽆状态。
Path与Visitor的关系
当你有⼀个 Identifier() 成员⽅法的访问者时,你实际上是在访问路径⽽⾮节点。 通过这种⽅式,你操作的就是节点的响应式路径⽽⾮节点本身。
const MyVisitor = {
  Identifier(path) {
    console.log("Visiting: " + path.node.name);
  }
};
a + b + c;
path.traverse(MyVisitor);
// Visiting: a
// Visiting: b
// Visiting: c
const MyVisitor = {
Identifier(path) {
console.log("Visiting: " + path.node.name);
}
};
a + b + c;
path.traverse(MyVisitor);
// Visiting: a
// Visiting: b
// Visiting: cScopes
在JS⾥,⽀持全局作⽤域与块级作⽤域
// global scope
function scopeOne() {
 // scope 1
 function scopeTwo() {
 // scope 2
 }
}
// global scope
function scopeOne() {
// scope 1
function scopeTwo() {
// scope 2
}
}在 JavaScript 中,每当你创建了⼀个引⽤,不管是通过变量(variable)、函数(function)、类型(class)、参数(params)、模块导⼊(import)还是标签(label)等,它都属于当前作⽤域。
var global = "I am in the global scope";
function scopeOne() {
  var one = "I am in the scope created by `scopeOne()`";
  function scopeTwo() {
    var two = "I am in the scope created by `scopeTwo()`";
  }
}
var global = "I am in the global scope";
function scopeOne() {
var one = "I am in the scope created by `scopeOne()`";
function scopeTwo() {
var two = "I am in the scope created by `scopeTwo()`";
}
}更深的内部作⽤域代码可以使⽤外层作⽤域中的引⽤。
function scopeOne() {
  var one = "I am in the scope created by `scopeOne()`";
  function scopeTwo() {
    one = "I am updating the reference in `scopeOne` inside `scopeTwo`";
  }
}
function scopeOne() {
var one = "I am in the scope created by `scopeOne()`";
function scopeTwo() {
one = "I am updating the reference in `scopeOne` inside `scopeTwo`";
}
}内层作⽤域也可以创建和外层作⽤域同名的引⽤。
function scopeOne() {
  var one = "I am in the scope created by `scopeOne()`";
  function scopeTwo() {
    var one = "I am creating a new `one` but leaving reference in `scopeOne()` alone.";
  }
}
function scopeOne() {
var one = "I am in the scope created by `scopeOne()`";
function scopeTwo() {
var one = "I am creating a new `one` but leaving reference in `scopeOne()` alone.";
}
}所以在编写时,必须⼩⼼作⽤域。我们得确保在改变代码的各个部分时不会破坏已经存在的代码。我们在添加⼀个新的引⽤时需要确保新增加的引⽤名字和已有的所有引⽤不冲突。 或者我们仅仅想找出使⽤⼀个变量的所有引⽤, 我们只想在给定的作⽤域(Scope)中找出这些引⽤。
作⽤域可以被表示为如下形式:
{
  path: path,
  block: path.node,
  parentBlock: path.parent,
  parent: parentScope,
  bindings: [...]
}
{
path: path,
block: path.node,
parentBlock: path.parent,
parent: parentScope,
bindings: [...]
}当你创建⼀个新的作⽤域时,需要给出它的路径和⽗作⽤域,之后在遍历过程中它会在该作⽤域内收集所有的引⽤(“绑定”)。⼀旦引⽤收集完毕,你就可以在作⽤域(Scopes)上使⽤各种⽅法。
所有引⽤属于特定的作⽤域,引⽤和作⽤域的这种关系被称作:绑定(binding)
function scopeOnce() {
  var ref = "This is a binding";
  ref; // This is a reference to a binding
  function scopeTwo() {
    ref; // This is a reference to a binding from a lower scope
  }
}
// 绑定作⽤域后
{
 identifier: node,
 scope: scope,
 path: path,
 kind: 'var',
 referenced: true,
 references: 3,
 referencePaths: [path, path, path],
 constant: false,
 constantViolations: [path]
}
function scopeOnce() {
var ref = "This is a binding";
ref; // This is a reference to a binding
function scopeTwo() {
ref; // This is a reference to a binding from a lower scope
}
}
// 绑定作⽤域后
{
identifier: node,
scope: scope,
path: path,
kind: 'var',
referenced: true,
references: 3,
referencePaths: [path, path, path],
constant: false,
constantViolations: [path]
}有了这些信息就可以查找⼀个绑定的所有引⽤,并且知道这是什么类型的绑定(参数,定义等),查找它所属的作⽤域,或者拷⻉它的标识符。 甚⾄可以知道它是不是常量,如果不是,那么是哪个路径修改了它。
熟悉 Babel的API
Babel 实际上是⼀组模块的集合。下⾯主要介绍下babel模块的功能,具体内容请参考官方的文档
Babylon
Babylon 是 Babel 的解析器。最初是 从Acorn项⽬fork出来的。Acorn⾮常快,易于使⽤,并且针对⾮标准特性(以及那些未来的标准特性) 设计了⼀个基于插件的架构。
import * as babylon from "babylon";
const code = `function square(n) {
 return n * n;
}`;
babylon.parse(code);
// Node {
// type: "File",
// start: 0,
// end: 38,
// loc: SourceLocation {...},
// program: Node {...},
// comments: [],
// tokens: [...]
// }
import * as babylon from "babylon";
const code = `function square(n) {
return n * n;
}`;
babylon.parse(code);
// Node {
// type: "File",
// start: 0,
// end: 38,
// loc: SourceLocation {...},
// program: Node {...},
// comments: [],
// tokens: [...]
// }babel-traverse
Babel Traverse(遍历)模块维护了整棵树的状态,并且负责替换、移除和添加节点。可以和Babylon ⼀起使⽤来遍历和更新节点:
import * as babylon from "babylon";
import traverse from "babel-traverse";
const code = `function square(n) {
 return n * n;
}`;
const ast = babylon.parse(code);
traverse(ast, {
  enter(path) {
    if (
      path.node.type === "Identifier" &&
      path.node.name === "n"
    ) {
      path.node.name = "x";
    }
  }
});
import * as babylon from "babylon";
import traverse from "babel-traverse";
const code = `function square(n) {
return n * n;
}`;
const ast = babylon.parse(code);
traverse(ast, {
enter(path) {
if (
path.node.type === "Identifier" &&
path.node.name === "n"
) {
path.node.name = "x";
}
}
});babel-types
Babel Types模块是⼀个⽤于 AST 节点的 Lodash 式⼯具库, 它包含了构造、验证以及变换 AST节点的⽅法。 该⼯具库包含考虑周到的⼯具⽅法,对编写处理AST逻辑⾮常有⽤。
import traverse from "babel-traverse";
import * as t from "babel-types";
traverse(ast, {
  enter(path) {
    if (t.isIdentifier(path.node, { name: "n" })) {
      path.node.name = "x";
    }
  }
});
import traverse from "babel-traverse";
import * as t from "babel-types";
traverse(ast, {
enter(path) {
if (t.isIdentifier(path.node, { name: "n" })) {
path.node.name = "x";
}
}
});Definitions(定义)
Babel Types模块拥有每⼀个单⼀类型节点的定义,包括节点包含哪些属性,什么是合法值,如何构建节点、遍历节点,以及节点的别名等信息。
单⼀节点类型的定义形式如下:
defineType("BinaryExpression", {
  builder: ["operator", "left", "right"],
  fields: {
    operator: {
      validate: assertValueType("string")
    },
    left: {
      validate: assertNodeType("Expression")
    },
    right: {
      validate: assertNodeType("Expression")
    }
  },
  visitor: ["left", "right"],
  aliases: ["Binary", "Expression"]
});defineType("BinaryExpression", {
builder: ["operator", "left", "right"],
fields: {
operator: {
validate: assertValueType("string")
},
left: {
validate: assertNodeType("Expression")
},
right: {
validate: assertNodeType("Expression")
}
},
visitor: ["left", "right"],
aliases: ["Binary", "Expression"]
});babel-generator
Babel Generator模块是 Babel 的代码⽣成器,它读取AST并将其转换为代码和源码映射(sourcemaps)。
import * as babylon from "babylon";
import generate from "babel-generator";
const code = `function square(n) {
  return n * n;
}`;
const ast = babylon.parse(code);
generate(ast, {}, code);
// {
// code: "...",
// map: "..."
// }
import * as babylon from "babylon";
import generate from "babel-generator";
const code = `function square(n) {
return n * n;
}`;
const ast = babylon.parse(code);
generate(ast, {}, code);
// {
// code: "...",
// map: "..."
// }babel-template
babel-template 是另⼀个虽然很⼩但却⾮常有⽤的模块。 它能让你编写字符串形式且带有占位符的代码来代替⼿动编码, 尤其是⽣成的⼤规模 AST的时候。 在计算机科学中,这种能⼒被称为准引⽤(quasiquotes)。
import template from "babel-template";
import generate from "babel-generator";
import * as t from "babel-types";
const buildRequire = template(`var IMPORT_NAME = require(SOURCE);`);
const ast = buildRequire({
  IMPORT_NAME: t.identifier("myModule"),
  SOURCE: t.stringLiteral("my-module")
});
console.log(generate(ast).code);
// var myModule = require("my-module");
import template from "babel-template";
import generate from "babel-generator";
import * as t from "babel-types";
const buildRequire = template(`var IMPORT_NAME = require(SOURCE);`);
const ast = buildRequire({
IMPORT_NAME: t.identifier("myModule"),
SOURCE: t.stringLiteral("my-module")
});
console.log(generate(ast).code);
// var myModule = require("my-module");注意:在Babel7.x版本中,所有的API都移动到了@babel命名空间下。@babel/core、@babel/parser、@babel/generator、@babel/types。
一个简单的插件
我们使用Babel 7.x版本的API来实现一个增强console.log打印语句功能的逻辑。我们的具体要求是,在打印log语句的时候,输出代码的位置(包括行号和列号)。
先看下源代码:
const sourceCode = `
console.log(1);

function func() {
  console.info(2);
}

export default class Student {
  sayHi() {
    console.debug('hello...');
  }
  learn() {
    console.error('I am learning ....')
  }
}
`;
const sourceCode = `
console.log(1);
function func() {
console.info(2);
}
export default class Student {
sayHi() {
console.debug('hello...');
}
learn() {
console.error('I am learning ....')
}
}
`;调用 Babel的相关API,转换成目标代码:
const parser = require('@babel/parser');
const traverse = require('@babel/traverse').default;
const generate = require('@babel/generator').default;
const types = require('@babel/types');

const ast = parser.parse(sourceCode, {
  sourceType: 'module', // 源代码为 ES module 格式
});

traverse(ast, {
  CallExpression(path, state) {
    if (types.isMemberExpression(path.node.callee)
      && path.node.callee.object.name === 'console'
      && ['log', 'info', 'error', 'debug'].includes(path.node.callee.property.name)
    ) {
      const { line, column } = path.node.loc.start;
      path.node.arguments.unshift(types.stringLiteral(`filename: (${line}, ${column})`));
    }
  },
});
const parser = require('@babel/parser');
const traverse = require('@babel/traverse').default;
const generate = require('@babel/generator').default;
const types = require('@babel/types');
const ast = parser.parse(sourceCode, {
sourceType: 'module', // 源代码为 ES module 格式
});
traverse(ast, {
CallExpression(path, state) {
if (types.isMemberExpression(path.node.callee)
&& path.node.callee.object.name === 'console'
&& ['log', 'info', 'error', 'debug'].includes(path.node.callee.property.name)
) {
const { line, column } = path.node.loc.start;
path.node.arguments.unshift(types.stringLiteral(`filename: (${line}, ${column})`));
}
},
});输出的结果如下:
console.log("filename: (2, 4)", 1);
function func() {
  console.info("filename: (5, 8)", 2);
}
export default class Student {
  sayHi() {
    console.debug("filename: (10, 12)", 'hello...');
  }
  learn() {
    console.error("filename: (13, 10)", 'I am learning ....');
  }
}console.log("filename: (2, 4)", 1);
function func() {
console.info("filename: (5, 8)", 2);
}
export default class Student {
sayHi() {
console.debug("filename: (10, 12)", 'hello...');
}
learn() {
console.error("filename: (13, 10)", 'I am learning ....');
}
}现在判断条件比较复杂,要先判断 path.node.callee 的类型,然后一层层取属性来判断,其实我们可以用 generator 模块来简化.
const targetCalleeName = ['log', 'info', 'error', 'debug'].map((item) => `console.${item}`);
traverse(ast, {
  CallExpression(path, state) {
    const calleeName = generate(path.node.callee).code;
    if (targetCalleeName.includes(calleeName)) {
      const { line, column } = path.node.loc.start;
      path.node.arguments.unshift(types.stringLiteral(`filename: (${line}, ${column})`));
    }
  },
});
const targetCalleeName = ['log', 'info', 'error', 'debug'].map((item) => `console.${item}`);
traverse(ast, {
CallExpression(path, state) {
const calleeName = generate(path.node.callee).code;
if (targetCalleeName.includes(calleeName)) {
const { line, column } = path.node.loc.start;
path.node.arguments.unshift(types.stringLiteral(`filename: (${line}, ${column})`));
}
},
});将其改造成Babel插件的写法。
// console-log-plugin.js
const generate = require('@babel/generator').default;

const targetCalleeName = ['log', 'info', 'error', 'debug'].map((item) => `console.${item}`);
module.exports = function ({ types, template }) {
  return {
    visitor: {
      CallExpression(path, state) {
        const calleeName = generate(path.node.callee).code;
        if (targetCalleeName.includes(calleeName)) {
          const { line, column } = path.node.loc.start;
          path.node.arguments.unshift(types.stringLiteral(`filename: (${line}, ${column})`));
        }
      },
    },
  };
};
// console-log-plugin.js
const generate = require('@babel/generator').default;
const targetCalleeName = ['log', 'info', 'error', 'debug'].map((item) => `console.${item}`);
module.exports = function ({ types, template }) {
return {
visitor: {
CallExpression(path, state) {
const calleeName = generate(path.node.callee).code;
if (targetCalleeName.includes(calleeName)) {
const { line, column } = path.node.loc.start;
path.node.arguments.unshift(types.stringLiteral(`filename: (${line}, ${column})`));
}
},
},
};
};测试,调用上面写好的插件:
// main.js
const { transformFileSync } = require('@babel/core');
const path = require('path');
const consolePlugin = require('./console-log-plugin.js');

const { code } = transformFileSync(path.join(__dirname, './test/source-code.js'), {
  plugins: [consolePlugin],
  parserOpts: {
    sourceType: 'module',
  },
});

console.log(code);
// main.js
const { transformFileSync } = require('@babel/core');
const path = require('path');
const consolePlugin = require('./console-log-plugin.js');
const { code } = transformFileSync(path.join(__dirname, './test/source-code.js'), {
plugins: [consolePlugin],
parserOpts: {
sourceType: 'module',
},
});
console.log(code);至此,一个简单的Babel插件就写好了。
总结
本文主要讲了有关 Babel的 重要概念,核心的处理流程,重要的API,最后写了一个简单的插件收尾。
Babel 在前端工程中作用很重要,应用非常的广泛,在webpack、rollup等构建工具打包时,一般都会用到Babel作为编译源码的转换器。 掌握 Babel的原理,在必要的时候能编写一个插件,解决业务问题,是前端同学需要掌握的基本能力。